
Frequently Asked Questions
General Questions
-
Is the original version of MarkdownPad (version 1) still available?
-
Can I have MarkdownPad 2 and MarkdownPad 1 installed at the same time?
-
My anti-virus software has identified a threat in MarkdownPad.
Sales and Licensing Questions
-
I purchased a MarkdownPad Pro license, but I haven't received my license information via email yet.
-
I'm using PayPal's Security Key feature and am unable to purchase a license via PayPal.
Feature Questions
Markdown Questions
Technical Issues
-
LivePreview is not working - it displays an error message stating
This view has crashed! -
LivePreview appears to be frozen, unresponsive, or does not scroll.
-
IME text input stops working after clicking buttons in the MarkdownPad toolbar.
-
Why are my images (using relative URLs) missing when I export a PDF?
-
Why are my Headings not working in GitHub Flavored Markdown?
-
I have a high DPI display, and the LivePreview pane doesn't render properly with display scaling.
GitHub Flavored Markdown
General Questions
What are the system requirements for MarkdownPad?
MarkdownPad's only requirement is the Microsoft .NET Framework 4 Client Profile, which will be automatically installed if you don't already have it.
MarkdownPad is compatible with Windows XP, Windows Vista, Windows 7, and Windows 8.
Is there a portable version of MarkdownPad?
Yes: Download MarkdownPad 2 Portable.
After downloading the portable version, simple extract the compressed zip file and run MarkdownPad2.exe. The portable version will function exactly the same as the installed version.
With the portable version of MarkdownPad, users without installation privileges on their PC can still use MarkdownPad.
Note: While the portable version doesn't require installation, it still uses Windows' local and roaming user storage for saving application settings, stylesheets, etc. This will not cause issues on access-limited systems.
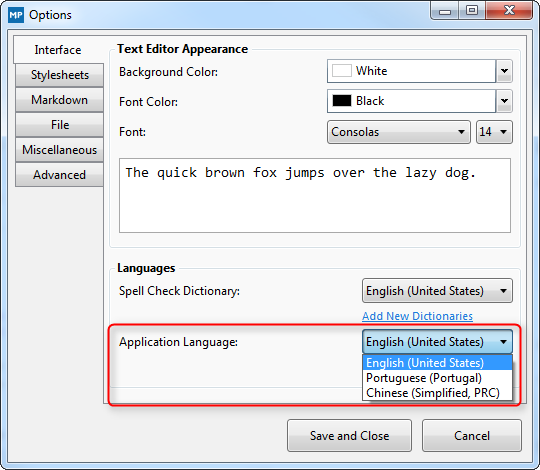
What languages are available in MarkdownPad?
MarkdownPad is currently available in the following languages:
- English (United States, en-US)
- Chinese (China, zh-CN)
- Chinese (Taiwan, zh-TW
- Portuguese (Portugal, pt-PT)
- German (Germany, de-DE)
- Polish (Poland, pl-PL)
- Russian (Russia, ru-RU)
- Finnish (finland, fi-FI)
- Italian (Italy, it-IT)
- Korean (Korea, ko-KR)
- Japanese (Japan, ja-JP)
- French (France, fr-FR)
- Danish (Denmark, da-DK)
- Swedish (Sweden, sv-SE)
- Catalan (ca-ES)
- Spanish (Spain, es-ES)
- Romanian (ro-RO)
- Many additional languages are currently in development
To change languages in MarkdownPad, navigate to Tools → Options → Interface tab and select a language under Application Language.
Can I help translate MarkdownPad?
Yes! If you'd like to help translate MarkdownPad, please visit the MarkdownPad Translation Project.
Is the original version of MarkdownPad (version 1) still available?
Yes, although it is no longer officially supported. Click here to download the original version of MarkdownPad.
Can I have MarkdownPad 2 and MarkdownPad 1 installed at the same time?
Yes, they are completely separate applications and can be installed side-by-side.
What is wyUpdate.exe?
MarkdownPad includes an automatic update feature which is powered by an open source tool called wyUpdate. This application must be present for MarkdownPad's automatic update feature to function properly.
My anti-virus software has identified a threat in MarkdownPad.
MarkdownPad is 100% virus-free, adware-free, malware-free, and spyware-free. MarkdownPad has also been independently verified as "100% clean" by Softpedia.
However, some anti-virus software may incorrectly identify components within MarkdownPad as a threat. These warnings are a false positive.
False positives are a common issue with anti-virus software, and since MarkdownPad is developed and published by a small, independent software developer, it can be more vulnerable to false threat identification.
If you have any questions about this topic, please contact us and we'd be glad to help.
Sales and Licensing Questions
Is MarkdownPad free for personal and commercial use?
MarkdownPad is free for personal use, and you can upgrade to MarkdownPad Pro to unlock additional features and support the developer. You can also check out a full feature comparison between the Free and Pro versions.
For commercial use, please purchase a MarkdownPad Pro license.
What does Single User licensing mean?
MarkdownPad Pro is licensed via a Single User license. This means that the software license "follows" the end user, allowing them to use MarkdownPad Pro on multiple computers as long as the end-user is the only person using the license at any time.
If any other users will use the software, an additional Single User license must be obtained for each user.
Examples:
-
Jim purchases one MarkdownPad Pro Single User license. He owns a laptop and a desktop computer. He can use the license on both computers, as long as he is the only person using the license.
-
Diane has 5 employees, and purchases one MarkdownPad Pro Single User license for one of her employees. If she wants all of her employees to use MarkdownPad Pro, she must purchase additional Single User licenses for each user - 5 total.
If you have any questions about licensing, please contact us and we'd be glad to help.
What payment methods are accepted?
MarkdownPad Pro licenses can be purchased using either PayPal, Amazon Payments, or by credit/debit card from the Buy MarkdownPad Pro page.
If you have questions about payments or want to discuss alternate payment methods, please contact us.
Can I make a bulk or multiple-license order?
Yes. Please contact us for more information.
I purchased a MarkdownPad Pro license, but I haven't received my license information via email yet.
Please contact sales@markdownpad.com and we'll re-issue you the license immediately. Please include the email address you used to purchase the license (it should be your PayPal or Amazon Payments email address) and your transaction ID if possible.
I purchased a MarkdownPad Pro license, but I receive the error message An error occurred while processing the license key when I enter it into MarkdownPad.
This error can be caused if a Microsoft dependency is missing from your operating system. If you receive this error, please install the Microsoft Visual C++ 2010 SP1 Redistributable Package (x86).
If you continue to have any issues activating your license, please contact us and we'd be glad to help.
I'm using PayPal's Security Key feature and am unable to purchase a license via PayPal.
PayPal users have the option of enabling an advanced security feature called PayPal Security Key, which is a form of two-factor authentication.
To use PayPal Security Key while purchasing a MarkdownPad Pro license, you must append your security key to the end of your PayPal password. For example, if you PayPal password was markdown and your PayPal security key was 123456, you would enter markdown123456 as your password while purchasing a license.
Feature Questions
How can I disable spell check?
Spell check can be disabled by clicking the "Book" icon in the status bar, and unchecking the "Enable spell check" item.
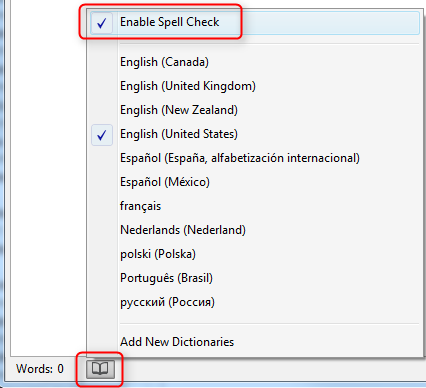
How do I install new spell check dictionaries?
Due to license restrictions for spell check dictionaries, MarkdownPad can only include a limited set of dictionaries. However, you can install new dictionaries following the instructions below.
- Find the dictionary you'd like to use, which must be in Hunspell/Aspell format. You can find many spell check dictionaries from the OpenOffice Dictionary Repository.
- The downloaded dictionary file should be in
.zipformat. If it is in a different format, change the file extension to.zipmanually. - Open the downloaded
.zipfile and extract its contents. - Locate two files: one that ends in
.affand one that ends in.dic. -
On your computer, navigate to the following folder:
- For 32-bit operating systems:
C:\Program Files\MarkdownPad 2\SpellCheck\dictionaries\ - For 64-bit operating systems:
C:\Program Files (x86)\MarkdownPad 2\SpellCheck\dictionaries\
- For 32-bit operating systems:
- Copy the
.affand.dicfiles from Step 3 to thedictionariesdirectory in Step 4. -
Make sure the
.affand.dicfiles are named using the standardized, official Culture Info name, with the language code separated from the culture code with an underscore (_).- For example, the files for German (Switzerland) would be
de_CH.dicandde_CH.aff.
- For example, the files for German (Switzerland) would be
- Open the MarkdownPad Options window (shortcut key
F7) and locate the newly added language in the Spell Check Dictionaries list.
This process will be simplified in a future version of MarkdownPad.
What is the difference between Full Document and High Performance rendering mode?
MarkdownPad 2 was designed with a high-performance Markdown rendering engine. This allowed MarkdownPad 2 to handle documents of any size, even in situations where MarkdownPad 1 would begin to experience performance issues. However, this high-performance rendering engine had a few side effects that caused minor rendering issues in LivePreview with elements like complex nested lists, long code blocks, and reference-style hyperlinks and images.
You can choose which rendering method is right for you: High Performance mode or Full Document mode. Full Document mode is enabled by default, but you can change the rendering mode under Tools → Options → Markdown tab → Rendering Mode.
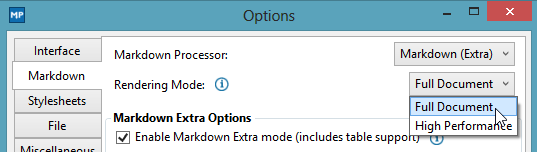
Here's what you need to know about the two systems:
Full Document Mode
This mode is similar to the original rendering system used in MarkdownPad 1, and will render your entire document in the LivePreview pane. This means your documents will appear as intended in the LivePreview pane. The downsides are that this mode may experience performance issues in large documents (20,000+ words) and you may find that the scrollbar synchronization is less accurate than in High Performance mode.
High Performance Mode
This is the mode that originally launched with MarkdownPad 2. Along with other improvements, only the content that is visible in the Editor pane will be rendered in the LivePreview pane. This mode can handle documents of any length, and will typically offer more accurate scrollbar synchronization. Its downside is that you may observe some minor rendering issues in certain situations (although they only affect LivePreview, nothing else).
Markdown Questions
Can I use named anchors (also known as "internal links") in my Markdown document?
Named anchors allow you to click a link in a document and be taken to a different location within the same document.
Yes, this is possible. Markdown specification allows raw HTML to be used in a Markdown document, so we can use that functionality to insert named anchors.
Example:
To get started, you just need to insert some very simple HTML into your document wherever you want to define a destination. This HTML is called a "named anchor", and looks like this:
<a name="myAnchor"></a>
Add that code in front of whatever content you want to "jump" to, like so:
<a name="myAnchor"></a>
## My Header ##
This is some content in my first section.
When your document is converted to HTML, you won't see the <a name="..." part anymore, but now you can refer to its specific name from anywhere else in the document.
You can add a link to myAnchor in your Markdown document like this:
[Go To Section One](#myAnchor)
Note: Make sure to prefix the link with the # symbol.
So to put it all together, a document with named anchors might look like this:
# Table of Contents

- [Go to Section One](#sectionOne)
- [Go to Section Two](#sectionTwo)

<a name="sectionOne"></a>
## My First Header ##
This is some content in my first section.

<a name="sectionTwo"></a>
## My Second Header ##
This is some content in my second section.
This technique is used to build the MarkdownPad FAQ page, which you're currently viewing.
Can I use an external CSS stylesheet in MarkdownPad?
Official support for external stylesheets is not yet available in MarkdownPad, although it will be added in a future update.
However, external stylesheets can be used right now with a simple procedure:
- Open the MarkdownPad stylesheet options under
Tools→Options→Stylesheets. - Click the
Addbutton to add a new stylesheet (orEditto edit an existing stylesheet) - If editing an existing stylesheet: Delete the contents of the existing stylesheet
- Paste the following code in the stylesheet editor:
@import url("YOUR-CSS-URL");, replacing YOUR-CSS-URL with the path to your external CSS file
That's it! Please note that this will include a reference to the stylesheet in your document; the stylesheet itself will not be included locally.
How do I use tables in Markdown?
MarkdownPad provides support for tables via "Markdown Extra" syntax. (Markdown Extra is a modified version of the original Markdown specification.)
To enable tables support:
- Navigate to
Tools→Options→Markdown tab, then selectMarkdown (Extra)as the Markdown processor.
You can now use tables using Markdown Extra table syntax.
Here's an example of table syntax:
First Header  | Second Header
------------- | -------------
Content Cell  | Content Cell
Content Cell  | Content Cell
Technical Issues
LivePreview is not working - it displays an error message stating This view has crashed!
This issue has been specifically observed in Windows 8. You may see an error message as shown here, and no HTML will be rendered when you type in the Markdown Editor pane.
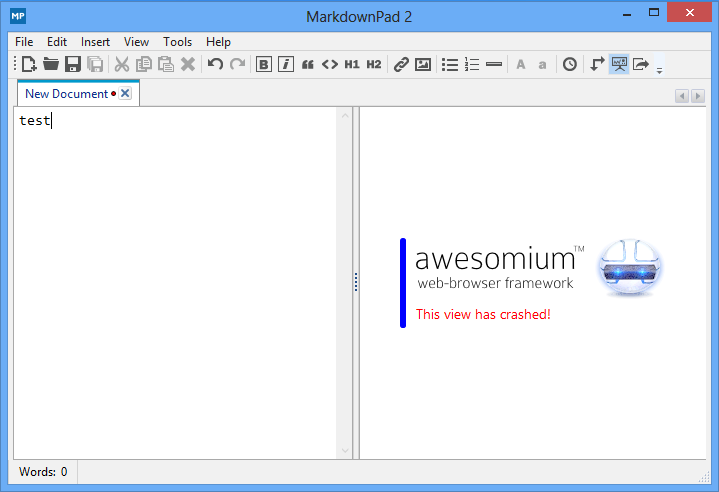
To fix this issue, please try installing the Awesomium 1.6.6 SDK.
If you continue to experience issues, please install Microsoft's DirectX End-User Runtimes (June 2010).
I'm having a problem using Windows 10 Technical Preview
To use MarkdownPad in Windows 10 Technical Preview, please follow these steps.
LivePreview appears to be frozen, unresponsive, or does not scroll
This issue may affect some users with Intel video cards, and appears to be more frequent with Lenovo computers. If you experience a frozen or unresponsive LivePreview pane, please update your video drivers.
You can get the latest version of Intel's video drivers from the Intel Download Center. The Intel Driver Update Utility can be used to automatically update your video drivers.
The content in the Markdown Editor pane is not accurately synchronizing its position with the LivePreview content
By default, MarkdownPad uses a Full Document rendering mode. This mode can cause minor position synchronization issues in specific scenarios, especially when dealing with long documents that use HTML elements that have a larger vertical space footprint than their Markdown equivalents.
To fix this issue, try changing to High Performance rendering mode under Tools → Options → Markdown tab → Rendering Mode. Click here for more information.
IME text input stops working after clicking buttons in the MarkdownPad toolbar.
IME is an text input system frequently used by Chinese and Japanese-speaking users.
This issue has been fixed as of MarkdownPad v2.1.6. Please update to the newest version of MarkdownPad when possible.
Why are my images (using relative URLs) missing when I export a PDF?
This issue was resolved in MarkdownPad v2.1.12.
Why are my Headings not working in GitHub Flavored Markdown?
If you are using Headings in the format of #This is my heading (without a space between the # symbol and the Heading text), they may not be rendered correctly in GitHub Flavored Markdown. This is due to an inconsistency of Markdown processing in the official GitHub API.
To resolve the issue, you can include a space between the # symbol and the Heading text. For example, # This is my heading would be properly rendered.
MarkdownPad displays the error message It looks like you aren't connected to the internet when I try using a feature that requires an active network connection, but I have a working network connection.
If you experience this issue, you can disable network connection verification.
- Navigate to Tools → Options.
- Click the Advanced tab.
- Locate the Network Settings section.
- Uncheck the option Verify the internet connection exists...
I have a high DPI display, and the LivePreview pane doesn't render properly with display scaling.
Currently, the LivePreview pane has a known issue with scaled, high DPI displays.
As a workaround, George Hahn created an updated stylesheet to support high DPI displays.
An official fix will be provided in a future update.
GitHub Flavored Markdown
Can I use GitHub's Two-Factor Authentication with MarkdownPad?
MarkdownPad does not currently support GitHub's Two-Factor Authentication system. However, you can generate a Personal Access Token to log in to your GitHub account instead.
- Visit the following URL: https://github.com/settings/tokens/new
- Enter a description in the Token description field, like "MarkdownPad 2 token".
- Click Create Token.
- Your new Personal Access token will be displayed.
- Copy this token, and enter it as your GitHub password in MarkdownPad. You can now log in as usual.
If you ever want to revoke the token, visit the GitHub Applications settings page and click Delete next to the key you wish to remove.